How to improve your portrait photography through photo retouching and photoshop manipulation6/23/2016 I do not bother with story board when I shoot. I leave it for those who need guidelines find it difficult to shoot without following a plan. I do not plan, I react. It is the combination of what I see with what I know and the light that is being cast that makes my brain go creative mode. However, when you shoot for a specific concept, such as photoshop manipulation, it is good to know how to bring the base photo to as close as possible to what you need as your digital clay. Below you can see my latest photoshop manipulation of my self portrait. I wanted it to be dark and mysterious, like a scene from a fantasy game (think in terms of Greybeards from Skyrim). What I needed was a head and shoulders portrait of myself in something that would imitate hooded rags (I wrapped around myself black muslin cloth that I use as a backdrop for studio portraits), and a blend of evenly lit image with deep well defined shadows at the same time. 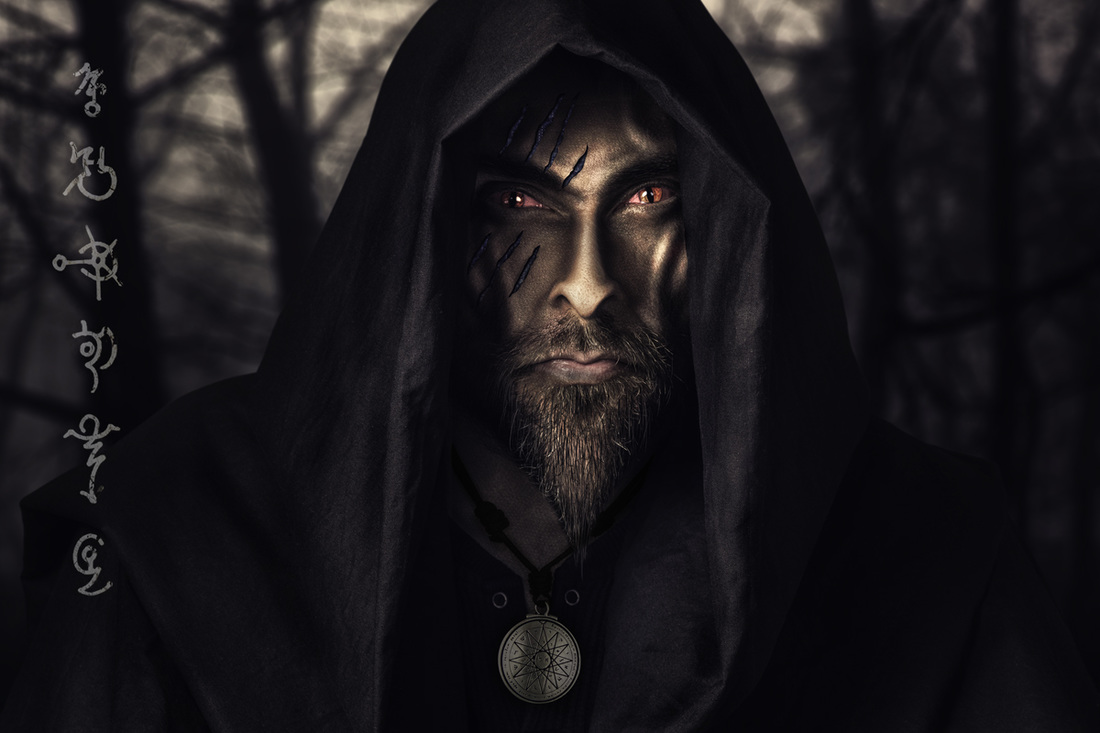 I knew I will be going for an older and wiry face, with accentuated face features so that I can push those even further in photoshop via dodging and burning. But I also knew that I cannot make the photo too dramatic (too low key) because contrast is something that I will adjust as I create the photoshop manipulation. At the same time I needed my face to be lit well enough so I can easily edit it. It is much easier to darken things down rather than brighten them up. Shadowed areas have less defined textures and are less three dimensional. If you watch the below video, you will notice at the beginning the original photo, straight from the camera. I lit my face from a slightly elevated angle so the shadows amplify my cheek bones and jaw. I wanted the light more or less in the center so the face features will be more symmetrical and more powerful. I knew I will be cutting this photo out of the frame and since I did not have to deal with masking out hair I could get away without a back light. I used grid on my main light and the light that separates me faintly from the background is whatever light bounced off of the wall behind me. I needed catch lights in the eyes so I placed the softbox right above the field of view of the lens. Shooting with 85mm I had enough compression to get the light into a fairly low position. It was important because I did not want to use any fill light from underneath (it would ruin the shadows under the hood at the top of my head, and on the sides as well). Working with flash guns is tricky, because every centimeter of movement counts. You can ruin or completely change the mood in the photo or its composition by moving the light by literally a centimeter or two. Studio photography is amazing for teaching precision and understanding the light and how to control it. Photoshop is like a tripod. It will slow you down and allow you to analyze the photo you are editing. People who do not like to edit their photos and just run and gun will never ever truly understand the depths of composition. It is a mixture of talent, ability to sense the energy flow between the elements of the photo and hours and hours of hard work. Do not neglect your photo editing - it pays off and will aid you in growing artistically, not to mention it will help you a lot in improving your technical skills as a photographer. And remember - photo manipulation or editing is not there to rescue bad images, but to complete your artistic vision and imbue your photos with personal style.
Buy prints with my photography and calligraphy art - http://ponte-ryuurui.pixels.com/index.html?tab=galleries Photography workshops in Tokyo: http://www.ryuurui.com/photography-workshops.html Hire a photographer in Tokyo: http://www.ryuurui.com/hire-a-photographer-in-tokyo.html Photo blog: http://www.japan-in-photography.com/ Facebook: https://www.facebook.com/ponteryuurui Twitter: https://twitter.com/PonteRyuurui Google+: https://plus.google.com/u/0/+PonteRyuurui/postsFor more tutorials and how to videos check out my photoshop and photography tips and tricks YouTube channel: https://www.youtube.com/channel/UCEOVGZ2rpLhR7gSPvaexxxQ First, you need to have a solid basics in photoshop (or any other software that allows you to work with multiple layers). It is essential for working non destructively and also with multiple elements. Photoshop manipulations can have 100s of layers and 10s of complex groups of layers. Second, you need to reach into your creative side of the brain and think what theme, what idea, what environment, what details you will be needing to complete the final image. It does not have to be superbly precise but more or less you should set a direction or a theme, which can be altered or improved while you are putting it all together. You will need either stock images or your own photos. I prefer to use my own photos for the main subject, which in my case are models and stock images for completing the details. This gives me not only a greater connection and understanding of the mood, concept and idea behind the shoot (most of the time I shoot certain poses specifically for a photo manipualation, just like I did with this image that you can see below), but also I know exactly what lens and what angle my photo was taken at, which leads us to the next valid point of a successful photoshop manipulation. 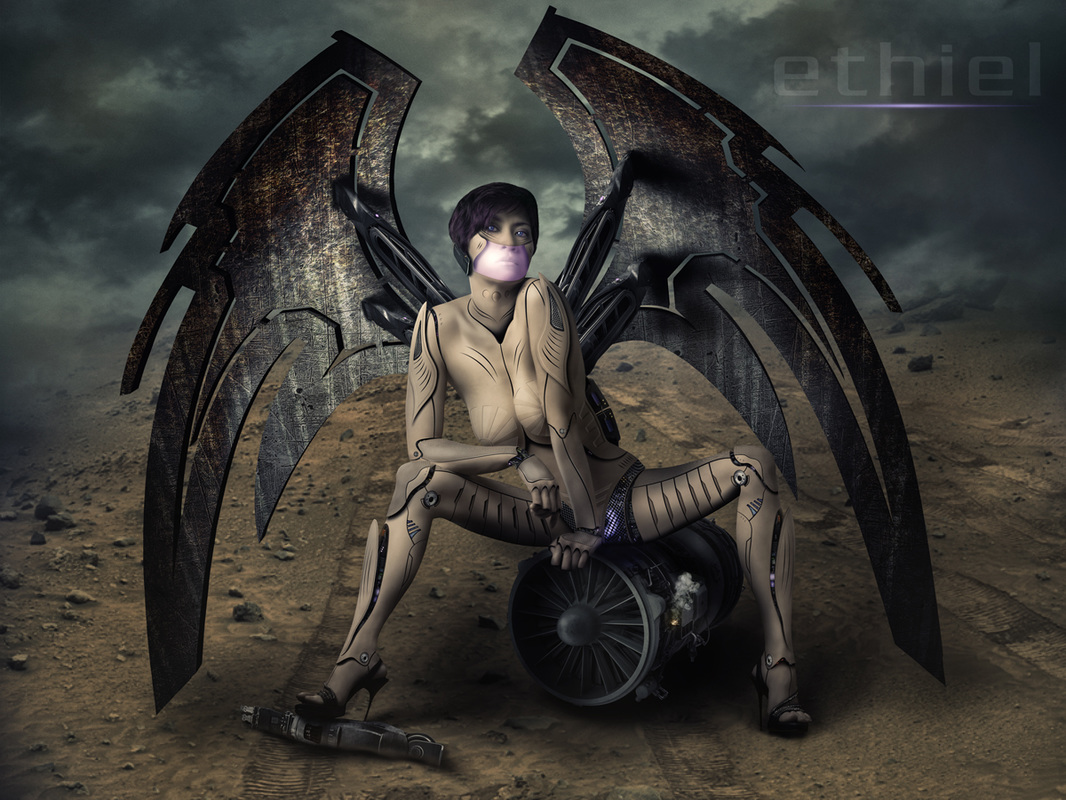 model: Eccaia Third, you need to understand and follow three fundamental rules of successful composite photography: 1. Perspective 2. Angles 3. Colors & tones You have to match the perspective, focal length and the angle of all the items that you place on your image. If you do not, human eye will detect it and render it as fake or not believable. The model has to match the ground, all the elements need to be following the same lines towards the vanishing point. It is good to match the depth of field too, or in other words make sure that the plane of focus is uniform across the image. Fourth, you will need a lot of patience because all good things take time, and believe me when I tell you that good photo manipulaton can take days to finish. Yes, I said days. The photo you see here is over 600 photoshop layers heavy, took me nearly 40h to complete. I am extremely detailed when I work on any of my images, whether it is portrait retouching or architecture photography, and I want to make sure that when I am done, the photo will look good not only on tiny iphne screen on instacrap. Here you can watch a full workflow in photoshop to see how much work went into details during creation of this composite. Fifth is to never give up even if you are failing.My oldest photoshop manipulations are terribad and that is fine. There is no progress without an error, and no discovery without failures. It is all a learning process and if you do not start you will never get into it. Look at the best work out there, the best concept artists and so on and look up to those who are better than yourself. That is the only way to grow and succeed. Have fun!
Contact me directly for one-to-one online photoshop tutorials via desktop sharing. Portrait photography service, Tokyo - website http://www.portrait-photography-tokyo.com/ Photography workshops in Tokyo: http://www.ryuurui.com/photography-workshops.html Hire a photographer in Tokyo: http://www.ryuurui.com/hire-a-photographer-in-tokyo.html Photo blog: http://www.japan-in-photography.com/ Facebook: https://www.facebook.com/ponteryuurui Twitter: https://twitter.com/PonteRyuurui Google+: https://plus.google.com/u/0/+PonteRyuurui/posts For more tutorials and how to videos check out my photoshop and photography tips and tricks YouTube channel: https://www.youtube.com/channel/UCEOVGZ2rpLhR7gSPvaexxxQ Regardless of what type of artist you may be portfolio is your business card. It is your resume, marketing tool, an ad and a statement in one. It says "look this is what I can do and that is my style". It is also a self-check medium for you as the author of its content. There is no time frame within which you should review your folio. you should do it as often as needed, or as often as you feel it is necessary. If you are like me and you love editing your photos, love learning and are on a constant hunt for new ideas, new ways of retouching, new ways of toning images and so on, you will realize two things very quickly. One is that the quality of your work improves with passing time, and two, that your style is evolving. Consequently, if you have a mix of old and new images in your folio, it may happen so that some of them may become outdated and inconsistent in terms of their style. This sends a clear message to your clients that you are not a mature artist, or perhaps a lazy one, who cannot see inconsistency in his or her own work, etc. All that suggests unreliability. Also, clients will choose you mainly for your style and quality of work. They do not know you in person, so all they know about you is what they can see in your portfolio. It is essential to develop a self assessment routine and implement it rigorously in your timetable. Yes, it is time consuming, but it is worth it in more ways than one.  new edit  old edit Look at the above images which were created within less than a year. The top one is a new version and the bottom one was created last year. It is a whole new edit from scratch, and you do not have to take my word for it, just watch the video below which shows the entire editing workflow in photoshop. Both photos are very different in style and quality. First the quality of texture is much better in the new edit. Old version suffered from texture loss due to blur vignetting done manually without working on tones layer and texture layer separately. This is something I would not do now. Also, skin texture received a much more detailed retouch via micro dodging and burning which eliminates small skin bumps amplified by the hard steep angled light. Vignetting is executed very selectively in the new photo, and it complements the way I reshaped the body of the model with shadows and highlights. The entire image was turned on its axis counter-clockwise to add more kinetic energy and create diagonal lines across the image. They contrast with a general calm and moody feel to the photo. The old edit was a bit too static for my liking and was not multilayered. Dodging and burning emphasizes the drama and creates more visual anchors. I added a tilt shift blur to redirect the attention of the viewer to the body art and lines running across model's body. I also changed the toning to much warmer, which further calms the feel of the photo. There are no happy accidents here, it is all planned and premeditated based on what I feel when I look at the photo. The old edit was not in full agreement with my current style and it had to be addressed. I truly enjoy re-working my images. Some of them I re-edit a few times, even complex photoshop manipulations. I do not care how much time it takes. It is always a very rewarding and educational experience.
Photography workshops in Tokyo: http://www.ryuurui.com/photography-workshops.html Hire a photographer in Tokyo: http://www.ryuurui.com/hire-a-photographer-in-tokyo.html Photo blog: http://www.japan-in-photography.com/ Facebook: https://www.facebook.com/ponteryuurui Twitter: https://twitter.com/PonteRyuurui Google+: https://plus.google.com/u/0/+PonteRyuurui/postsFor more tutorials and how to videos check out my photoshop and photography tips and tricks YouTube channel: https://www.youtube.com/channel/UCEOVGZ2rpLhR7gSPvaexxxQ  The main purpose of this book is not to teach Japanese kanji, but help you to understand and appreciate the vast complexity and philosophical and cultural depth of Chinese writing system. I talk in details about the etymology of 50 chosen characters, at a speed of one character per chapter. There are over 400 illustration inside the book, and all of them are not only actual historical characters taken from ink rubbings of outstanding Chinese and Japanese calligraphy masterpieces, ranging from 1600BCE to 19th century CE., but each of those illustrations has a detailed description regarding who wrote it and when, with other interesting historical facts or trivia, either about the classic or the author.
The true value of this book is that the key contents are based purely on Japanese or Chinese literature, and not translations into other languages. I bring you knowledge that is hidden behind the language barrier for most of the Western world. One of my main sources for this book were publications by one of the greatest modern scholars of the etymology of Chinese writing, Shirakawa Shizuka (白川静, 1910 - 2006), who sadly passed away in 2006. His books are hugely valued not only in Japan but also in China and Taiwan. Since his publications are quite encyclopedic, and are based on numerous abbreviations and connotations, even native speakers whose field is Japanese or Chinese language, find those books difficult to read. I invested a great amount of time and effort, and backed it up with my years of experience in the field of Chinese and Japanese calligraphy, to explore a lot of side topics and intriguing fact on the subject of origins of kanji, and included them in my book. Etymology of Japanese kanji - in-depth analysis of selected characters is a book aimed at anyone who is interested in Chinese or Japanese language, or history of ancient China and Japan, or any enthusiasts who appreciate the culture and philosophy or the Far East. The title of this book was the most difficult thing to decide on, since it is impossible to talk about Japanese kanji without discussing Chinese characters, which in some cases are the same thing, and in others are different. I decided on Japanese kanji in the title, mainly because I live in Japan and this is also where I study calligraphy. If you have any questions regarding the book, feel free to send them directly to me or leave a comment below. This video tutorial is for lazy people like myself who cannot be bothered reading. I wrote an article on my other page, Portrait Photography Tokyo, that gives tips on how to crop photos in photoshop and you can read it here, though this video is probably covering it in greater depth. Cropping is nothing else but an attempt at fine tuning composition. If you shoot on a tripod, your composition should be spot on, but if you shoot quick and hand held things may get a bit misaligned. I create many composite images and photoshop manipulations so for me cropping is a second nature. Cropping is a fantastic exercise for improving your composition, and composition is one of the most important things in photography, or any type of art really. So take your time, bring some photos into photoshop and try different ways of cropping one image, you may be surprised what you can learn. In this video I am taking one image and showing you a few ways of cropping it, and explain in details why I cropped it this way or another, which brings you behind the scenes and lets you understand my thought flow. You can apply anything from this photoshop tutorial to your photography when you are out and shooting. Enjoy! Anyone interested in private photoshop workshops via skype desktop sharing please contact me directly. If you are looking for a portrait photographer in Tokyo, check out my services menu tab. My Youtube channel with free photoshop tutorials Photography workshops in Tokyo - click for more details. Hire a photographer in Tokyo Buy original Chinese and Japanese calligraphy art Check out my new portrait photography services in Tokyo website! How to start with photoshop #5 - layers & masks (photoshop tutorial series for beginners)11/15/2015 In this episode of free photoshop tutorials for beginners I will help you to understand layers and masks and how to use them in practice. The whole series is designed for photographers who either want to improve photoshop skills, or those of you who made the right decision of moving from Lightroom to Photoshop to do some proper photo editing. Photoshop layers and masks is what makes photoshop such a unique tool and what places it high above the abilities of Lightoroom. You can work non-destructively on your photos by stacking various effects as adjustment layers, on top of it you can fine tune those adjustments via blending, opacity and masks. Blending modes and opacity / fill are used for executing global shifts between layers, and masks are there for targeting certain areas of your image that you wish to fix or enhance. By the end of this video you will have a solid grasp on the basics of layers and masks and be aware of its massive potential. If you would prefer private photoshop workshops via skype desktop sharing then contact me directly. My Youtube channel with free photoshop tutorials Photography workshops in Tokyo - click for more details. Hire a photographer in Tokyo Buy original Chinese and Japanese calligraphy art Check out my new portrait photography services in Tokyo website! In this next photoshop tutorial for beginners I explain how to use vector tools on practical examples of photos. The most complex tool here is the pen tool, and it is also the most useful one. I coud not live without pen tool, it is an absolute life saver in editing of virtually any type of photos, but it is essential for making very precise selections in images portraying architecture, where there are many straight or curved lines and other selection tools simply fail. Pen tool is also amazing for editing portraiture and selecting body outline, or parts of the face, like eyes, lips, etc. I have a separate video on how to use pen tool in photoshop here. This part 4 of the photoshop tutorial series for photographers covers other tools such as color palette, pan tool, quick mask tool, and zoom tool. In next episode I will be discussing the basics of working with layers and masks, which lays at the very essence of photoshop workflow. If you would prefer private photoshop workshops via skype desktop sharing then contact me directly. My Youtube channel with free photoshop tutorials Photography workshops in Tokyo - click for more details. Hire a photographer in Tokyo Buy original Chinese and Japanese calligraphy art Check out my new portrait photography services in Tokyo website! Here is the third episode of photoshop tutorial for beginners that is aimed at photographers and explains basic photoshop tools and functions from a practical point of view based on actual photos. The idea is to help anyone who is getting started with photoshop and make this program appear a bit less intimidating. In this episode I am discussing the editing tools, which are: healing brushes, brush tools, clone stamp tools, history brushes, eraser, gradient tool, blur, sharpen and smudge tools, and lastly dodge, burn and sponge tools. This video is not meant to be in-depth tutorial on each of those tools, rather than a practical introduction that offers enough information for performing photo editing. Some of photoshop tools are more complex and some are more used than others so I will be creating separate videos on photoshop tools that I use the most in my day-to-day photoshop work. Next episode will cover vector tools and what I call complimentary tools, and then I will discuss how to work on layers and what are the most practical examples of using layer masks, then I will focus on editing an image from start to finish, and also show you how powerful is Adobe Camera RAW. If you would prefer private photoshop workshops via skype desktop sharing then contact me directly. My Youtube channel with free photoshop tutorials Photography workshops in Tokyo - click for more details. Hire a photographer in Tokyo Buy original Chinese and Japanese calligraphy art Check out my new portrait photography services in Tokyo website! Depth is one of very powerful tools in your photography tool box if you know how to use it to make your photos stand out even more. Depth adds dimensions, expands a photo visually, enhances the story telling, adds movement and helps the capture the viewer's attention for much longer, by creating a visual puzzle. Depth can be achieved by use of many techniques. One of them would be simply photographing your subject in a way that the background is visible but not detracting, still reading and adding to the story but not in an overpowering manner. The Other way would be working with contrast, sharpness and saturation, which can be done in post production, but not only. If you know or can control your light while shooting, those three elements can be captured on camera and then enhanced even further in photoshopp or lightroom. You can achieve depth via other means, such as motion blur, compositing photos, photo manipulations, and so on. Naturally capturing as much as you can on camera will help a great deal, so whenever you are out there shooting, try not to focus only on your subject, but also what is in front of it, behind it, on each side, and also on what is about to enter or leave the frame. My Youtube channel with free photoshop tutorials Photography workshops in Tokyo - click for more details. Hire a photographer in Tokyo Buy original Chinese and Japanese calligraphy art Check out my new portrait photography services in Tokyo website!  How to start with photoshop #2 - selection tools (photoshop tutorial series for beginners)10/22/2015 Selection tools are very important and useful for almost any photo editing. Starting with simple and basic selections made with a rectangular marquee tool through a bit more complex magnetic lasso tool to an advanced options such as pen tool or channel based selections, selection tools are a bread and butter of my daily work in photoshop, regardless whether I am editing an image or working on a complex photoshop manipulation. This video is aimed at beginners and it is a second in the series. I talk about selection tools and cover all necessary functions needed for basic retouching. More advanced videos will follow, including separate chapters for channels, pen tool, and more complex functions of basic selection tools, such as perspective warp, which was introduced in photoshop CS6. There are many videos onlien regarding photoshop, but I know how difficult is to find one ways around when you open the photoshop for the first time. I hope this series will make it easier for you. Stay tuned for upcoming videos in the beginners series. In new episodes I will be explaining how to use editing tools, vector tools, remaining tools, how to work on layers, and there also will be a separate video on adobe camera RAW basic functions. For more free photoshop tutorials feel free to view my YouTube channel. My Youtube channel with free photoshop tutorials Photography workshops in Tokyo - click for more details. Hire a photographer in Tokyo Buy original Chinese and Japanese calligraphy art Check out my new portrait photography services in Tokyo website! You can purchase all of my books now on several sites on the net, including amazon.com and Barnes & Noble. If you click below logos you will be redirected to the store. Each of the book has a preview, so you can look inside and see the contents (preview is limited to a few pages, but long enough to give you a good understanding of the contents of a given book). If you have any questions please let me know. I would like to thank all of you who purchased my recent publications, "Etymology of Japanese kanji - in-depth analysis of selected characters" in particular. If you enjoyed the read please leave a feedback on amazon or Barnes & noble pages, I really appreciate it.
How to start with photoshop #1 - photoshop interface (photoshop tutorial series for beginners)10/15/2015 This new series of photoshop tutorials for beginners will cover all aspects of photoshop from practical point of view. I already created a video on how to tweak various PC and photoshop settings to improve performance of photoshop and speed up photo editing workflow. Today I have released first video of the series that should help anyone who is new to photoshop. In this video I cover the entire interface, explain photoshop menus, show you how you can set up your own personalized working space and save it as a default, and explain how various panels and menus interact with one another. In upcoming video tutorials I will teach you all the tools and menu options in depth, based on practical examples so it is much easier to learn and understand. Photoshop tools and menus are not that difficult to learn, the whole trick is in knowing how to use all those tools together to achieve the result you want. I am sure you will have solid knowledge base at the end of the series. Any suggestions / ideas - please let me know. My Youtube channel with free photoshop tutorials Photography workshops in Tokyo - click for more details. Hire a photographer in Tokyo Buy original Chinese and Japanese calligraphy art Check out my new portrait photography services in Tokyo website! There are two ways that you can improve performance of your photoshop. One is via upgrading and tweaking your PC hardware, and the other is through software settings of your OS, photoshop, and other related programs. In terms of hardware, the key PC components that may have an impact on the performance of photoshop are the amount of RAM, number of CPU cores and their speed, VRAM of your graphics card, type of hard drives you are using (HDD vs. SSD, and monitor size / type. In terms of software, one has to consider OS version, anti virus programs, hardware settings and their drivers, photoshop updates, photoshop plugin updates, how many programs are running in the background, and numerous settings that have to be performed inside photoshop. To learn more about how you can improve the performance of your photoshop, watch the video linked below, in which I go through all those items in depth. My Youtube channel with free photoshop tutorials Photography workshops in Tokyo - click for more details. Hire a photographer in Tokyo Buy original Chinese and Japanese calligraphy art Check out my new portrait photography services in Tokyo website!  Officially published as of today! Learn Japanese Hiragana is one of three books on the subject of Japanese language and etymology that I have been working on for some time now. Although Learn Japanese Hiragana and Learn Japanese Katakana are separate and stand alone books, so it is possible to buy them as stand alone volumes. The most significant thing that distinguishes my books from any other hiragana and katakana textbooks out there, is that all and every single syllabary or a character was handwritten the way it should be. There is a huge discrepancy between a handwritten Japanese and computer fonts, and this subject is hugely neglected. When I started to study Japanese language 14 years ago, I always wished I had a book with handwritten examples of kanji, hiragana or katakana. But there is more. Not only each book has handwritten examples of hiragana and katakana, but also the kanji from which each of kana syllabaries evolved. Further, since hiragana evolved from kanji in cursive-script form, I included three different handwritten calligraphy scripts for each kanji to show a clear evolution from the standard script through semi-cursive to cursive script. In case of katakana I did the same thing with kanji radicals that each katakana evolved from. I have provided a detailed explanation of the origins of sounds of modern katakana and added a phonetic guidance based on pronunciation found in the online Oxford dictionary of English language. You should be able to replicate the proper sound of each katakana syllabary wit ease. In addition, I discuss the history of evolution of hiragana and katakana on a background of the history of Japanese calligraphy. I have included hand written stroke order charts of each syllabogram, with arrows pointing towards the correct direction of writing. All handwritten examples are based on traditional or historical Japanese calligraphy. Last but not least, I have included space for exercises, where you can practice your writing modelling yourself on the examples I have provided. Learn Japanese Katakana and Learn Japanese Hiragana is now available on my store on lulu.com, but in few weeks it will be available on Amazon, Barnes & Noble, etc. but if I receive enough requests I consider publishing it also in electronic form for Kindle, Nook, iBooks. Visit my page on Lulu bookstore to see preview of the book.   Officially published as of today! Learn Japanese Katakana is one of three books on the subject of Japanese language and etymology that I have been working on for some time now. Although Learn Japanese Katakana and Learn Japanese Hiragana are separate and stand alone books, so it is possible to buy them as stand alone volumes. The most significant thing that distinguishes my books from any other hiragana and katakana textbooks out there, is that all and every single syllabary or a character was handwritten the way it should be. There is a huge discrepancy between a handwritten Japanese and computer fonts, and this subject is hugely neglected. When I started to study Japanese language 14 years ago, I always wished I had a book with handwritten examples of kanji, hiragana or katakana. But there is more. Not only each book has handwritten examples of hiragana and katakana, but also the kanji from which each of kana syllabaries evolved. Further, since hiragana evolved from kanji in cursive-script form, I included three different handwritten calligraphy scripts for each kanji to show a clear evolution from the standard script through semi-cursive to cursive script. In case of katakana I did the same thing with kanji radicals that each katakana evolved from. I have provided a detailed explanation of the origins of sounds of modern katakana and added a phonetic guidance based on pronunciation found in the online Oxford dictionary of English language. You should be able to replicate the proper sound of each katakana syllabary wit ease. In addition, I discuss the history of evolution of hiragana and katakana on a background of the history of Japanese calligraphy. I have included hand written stroke order charts of each syllabogram, with arrows pointing towards the correct direction of writing. All handwritten examples are based on traditional or historical Japanese calligraphy. Last but not least, I have included space for exercises, where you can practice your writing modelling yourself on the examples I have provided. Learn Japanese Katakana and Learn Japanese Hiragana is now available on my store on lulu.com, but in few weeks it will be available on Amazon, Barnes & Noble, etc. but if I receive enough requests I consider publishing it also in electronic form for Kindle, Nook, iBooks. Visit my page on Lulu bookstore to see preview of the book.   We all have photos that we are not sure what to do with. Most of them are casual emotional snapshots of something that we though looked cool at the moment of taking. Either that, or we just take shots with the photoshop compositing in mind. To the left is a photo of one of my photoshop workshops students, taken in Croatia. Below, you can see my photoshop manipulation of that shot, in attempt to redesign the entire composition and feel to the photo. I really like that wall, it adds a lot of the Continental feel, that fragment of an island is something to balance that wall with, but the original image had no clear focus or a self sustained subject of the photo. Success of a photo is based on balance between the shapes and light, and it can be weighted like on a scale. Half of the job is to capture an image, and the other half lays in post production. Either is equally important, though as you can see from this example, knowledge of photo editing can be more powerful that the ability of capturing a good image. I teach photography with the vision of post processing, and you can see why I put so much stress on mastering photoshop. If you are interested in improving your photoshop knowledge you can read more about it here, or contact me directly. My Youtube channel with free photoshop tutorials Photography workshops in Tokyo - click for more details. Hire a photographer in Tokyo Buy original Chinese and Japanese calligraphy art Check out my new portrait photography services in Tokyo website!  It is possible that computers and robotics will kill us all off at some point but I plan to have as much fun with technology as possible until it happens. It is all down to learning the tools and how to use them in conjunction with one another, and it can be overwhelming in case of programs like photoshop, but it can be learned, and once you do you just down want to go back (if you are interested in learning photoshop, photo editing or photo manipulation - contact me directly and we can discuss private workshops). The same as it happened with cameras, when the digital ones phased out the film cameras. I know that film is still in use, but in all honesty, why bother. Digital is far more fun, clean and does not honk. Digital art and the literally endless creative possibilities it offers is all too good to pass on. I am already working on merging 2D with 3D and going completely mental with my sci fi projects. Girls interested in a photo shoot - currently looking for female models in Tokyo area interested in cyber sci fi art, Japanese calligraphy body art, or portrait shots. I am always looking for new faces and bodies so e-mail me in interested. My Youtube channel with free photoshop tutorials Photography workshops in Tokyo - click for more details. Hire a photographer in Tokyo Buy original Chinese and Japanese calligraphy art Check out my new portrait photography website! Sci fi sexy cyborg girl photoshop manipulation speed art video
HDR stands for High Dynamic Range and in photography it usually refers to a scene that has a massive differences between the dark and bright tones. Unlike a human eye, most of the digital cameras, or any cameras, cannot capture extreme dynamic range scenes, though the technology is drastically improving (Alpha Sony 7s comes to mind). So if you cannot dish tens of thousands of dollars for a medium format camera, then HDR editing software is the way to go, or at least it was for me. I used to work with Photomatix and HDR efex PRO 2 from Google software, but to be honest I never was fully satisfied with the results. The process is mostly automated and relatively fast, even if you will make final adjustments in photoshop, but when I started to manually blend layers in photoshop, my photos are clean, artifact free, without any crazy micro contrast or fake looking pale washed out colors (mainly red). Below is a short video that I made today, I am revising some of my older photos and I re-edit them. You can see below the RAW file, then my old HDR edit, and at the very bottom a manually blended image. For full length tutorial on manual blending see my 50 minute long video here. My Youtube channel with free photoshop tutorials Photography workshops in Tokyo - click for more details. Hire a photographer in Tokyo Buy original Chinese and Japanese calligraphy art
Manually digitally blended image  In this photoshop tutorial I will show you how you can easily edit and convert a photo inside Adobe Camera Raw without having to do absolutely nothing inside photoshop. Adobe Camera Raw is a very powerful tool, and it has many amazing options. In fact Lightroom editing options are build around Camera Raw functions. This tutorial will teach you how you can control contrast and colors of your photo, perform some simple dodging and burning, manipulate with light to direct the viewers attention to the place you want them to go, and finally how to convert the photo into a nice crispy and punchy black and white. My Youtube channel with free photoshop tutorials Photography workshops in Tokyo - click for more details. Hire a photographer in Tokyo Buy original Chinese and Japanese calligraphy art Tokyo is like a vision generator for anyone who is a fan of science fiction. Spaceships, hovercrafts, cyborgs, lasers - yes please! And Akihabara - the Electric City of Tokyo - is N.U.T.Z. God I love this place. When I was taking this shot, in my mind, it was a cut-scene from a sci fi flick. I mean come on, just look at it, it asks to be digitally meddled with. Anyways, the point is, when you shoot, always shoot with a vision of post processing, ALWAYS. And if you cannot post process your shots - learn it how to do it properly. No one is going to do it for you the way you would like to see your final photos. Got to have a vision guys, that is so important to your evolution as an artist. Taking photos is 50% of the fun, the rest happening inside your PC. There is a reason we all shoot in RAW, or at least you should, and it is to get the best ingredients possible and the most flexibility for your artistic cooking. So, learn how to cook, chicks dig it! My Youtube channel with free photoshop tutorials Photography workshops in Tokyo - click for more details. Hire a photographer in Tokyo Buy original Chinese and Japanese calligraphy art  Working on photos and editing tons of shots may lead to tunnel vision and resulting in similar type of edits. Lots of people use presets, not even knowing what they do. That includes the professional photographers as well. Some people don't even possess the skill to edit their own work, which is pretty scary. It is like a cook who buys veggies on the market and calls for help to cook the meal. Learning and studying will develop your artistic vision, and it is most likely to change over the time. I learn new skills on a daily basis, and my photoshop techniques improve quite rapidly. I am often revisiting some of my favoring works and re-editing them applying what I have learned since I worked on them. Sometimes I give photos a new twist. All in all I love editing 1 photo in many different ways. It leads to amazing discoveries. In this case the reason for editing is complex. One, is that I love this shot. Two, is that I love this calligraphy classic, and three is that this very classic is one of the mandatory subjects for my Master Instructor exams in calligraphy this year. model: Asuka / Japanese calligraphy - my copy of a Chinese classic Shu Pu from the early Tang Dynasty (7th century) by Sun Guoting, who was an absolute genius of cursive script.  I am back from a two day marathon with ink and brushes. Oh it was FANTASTIC. We had over 30 Grand Masters coaching us in 4 Chinese calligraphy scripts. We studies clerical script, cursive script, semi-cursive script and standard script. It was amazing to listen to various points of view they had and just listen to them explaining or writing, correcting our works and so on. Writing on a floor from early morning till late evening is not easy, so I am dead tired, but it was well worth it. I have learned a ton and the event had definitely helped me a lot in preparation for my upcoming Master Instructor exams next month. My Youtube channel with free photoshop tutorials Photography workshops in Tokyo - click for more details. Hire a photographer in Tokyo Buy original Chinese and Japanese calligraphy art    It often happens so that during photo editing in photoshop or lightroom we tend to overdo the editing. Whether it is saturation, contrast or sharpness, after having a second look we see that the photo is overcooked. This is exactly what I did to this portrait shot of my wife, so I went back in to photoshop and fixed it. Then I decided to create ansho0rt tutorial for you guys. If you find it useful make sure to subscribe to my channel for more photoshop tips and tricks. My Youtube channel with free photoshop tutorials Photography workshops in Tokyo - click for more details. Hire a photographer in Tokyo Buy original Chinese and Japanese calligraphy art In this video tutorial series I will show you how you can easily create a time lapse in photoshop. I will be using Bridge, Adobe Camera RAW, and Photoshop. Tutorial is split int part 1 is about preparing the files for the time lapse, and the second part will explain how to assemble a time-lapse in photoshop. Time lapse photography is great fun, it does require a lot of patience though, and quite a bit of post processing, but thanks to photoshop and other tools, it can be automated to a great degree. If you want to learn how to create a time lapse with ease, then watch my video tutorials. My Youtube channel with free photoshop tutorials Buy fine art photo prints at my store on SmugMug. Photography workshops in Tokyo - click for more details. Hire a photographer in Tokyo In this photoshop tutorial I will show you how to create an action in photoshop, and then how to use a photoshop action to add metadata to your photos. Photoshop actions are extremely powerful tools, and can automate a lot of mundane work, and repetitive tasks that you would normally have to perform manually. I use photoshop actions mainly for adding metadata to my pictures, but I used to apply actions that were adding watermarks, sharpened my photos and resized them with one click. Actions are a must learn thing if you want to improve and speed up your workflow in photoshop. I spend anywhere between 4 to 12h (or even longer) editing photos nearly every day, depending on how much work I have, and I do a lot of manual editing of my without certain procedures being automated I would simply be unable to accomplish so much within one day. My Youtube channel with free photoshop tutorials Buy fine art photo prints at my store on SmugMug. Photography workshops in Tokyo - click for more details. Hire a photographer in Tokyo |
Categories
All
AuthorPonte Ryuurui (品天龍涙) Archives
August 2020
|


 RSS Feed
